如何实现一个简易版的 Spring - 如何实现 @Autowired 注解

cover.jpg

前言

本文是 如何实现一个简易版的 Spring 系列第四篇,在 上篇 介绍了 @Component 注解的实现,这篇再来看看在使用 Spring 框架开发中常用的 @Autowired 注入要如何实现,大家用过 Spring 都知道,该注解可以用在字段构造函数以及setter 方法上,限于篇幅原因我们主要讨论用在字段的方式实现,其它的使用方式大体思路是相同的,不同的只是解析和注入方式有所区别,话不多说,下面进入我们今天的正题—如何实现一个简易版的 Spring - 如何实现 @Autowired 注解

实现步骤拆分

实现步骤总的来说分为三大步:

  1. 分析总结要做的事情,抽象出数据结构
  2. 利用这些数据结构来做一些事情
  3. 在某个时机注入到 Spring 容器中

细心的朋友可以发现,其实前面几篇文章的实现也是套路,其中最为关键也是比较困难的点就是如何抽象出数据结构。这里我们要做的是当某个 Bean 上的字段有 @Autowired 注解时,从容器中获取该类型的 Bean 然后调用该字段对应的 setter 方法设置到对象的属性中。下面就跟着这个思路去实现 @Autowired 注解。

数据结构抽象

要想根据字段的类型注入在容器中对应的实例,首先需要提供这个从一个类型获取对应 Bean 实例的能力,这需要 BeanFactory 接口提供一个这样的能力,等等,像这样容器内部使用的接口直接定义在 BeanFactory 好吗?像这种内部的操作应该尽量做到对使用者透明,所以这里新加一个接口 AutowireCapableBeanFactory 继承自 BeanFactory,这样在内部就可以直接使用新接口接口。需要注意的是新接口的方法参数并不能直接使用 Class 类型去容器中查找对应的 Bean,为了后期的灵活扩展(比如:是否必须依赖等),需要使用一个类来描述这种依赖,命名为 DependencyDescriptor,其部分源码如下所示:

1
2
3
4
5
6
7
8
9
10
11
12
13
14
15
16
17
18
19
20
21
22
23
24
25
/**
* @author mghio
* @since 2021-03-07
*/
public class DependencyDescriptor {
private Field field;
private boolean required;

public DependencyDescriptor(Field field, boolean required) {
Assert.notNull(field, "Field must not be null");
this.field = field;
this.required = required;
}

public Class<?> getDependencyType() {
if (this.field != null) {
return field.getType();
}
throw new RuntimeException("only support field dependency");
}

public boolean isRequired() {
return this.required;
}
}

接口 AutowireCapableBeanFactory 声明如下:

1
2
3
4
5
6
7
/**
* @author mghio
* @since 2021-03-07
*/
public interface AutowireCapableBeanFactory extends BeanFactory {
Object resolveDependency(DependencyDescriptor descriptor);
}

查找解析依赖的功能我们抽象完成了,下面来看看核心步骤如何抽象封装注入的过程,抽象总结后不难发现,注入可以分为两大部分:注入的目标对象需要被注入的元素列表,这些对于注入来说是一些元数据,命名为 InjectionMetadata,其包含两个字段,一个是注入的目标对象,另一个是被注入的元素列表,还有一个重要的方法将元素列表注入到方法参数传入的目标对象中去。

每个注入元素都要提供一个注入到指定目标对象的能力,所以抽取出公共抽象父类 InjectionElement,使用上文的 AutowireCapableBeanFactory 接口解析出当前字段类型对应 Bean,然后注入到指定的目标对象中。抽象父类 InjectinElement 的主要代码如下:

1
2
3
4
5
6
7
8
9
10
11
12
13
14
15
/**
* @author mghio
* @since 2021-03-07
*/
public abstract class InjectionElement {
protected Member member;
protected AutowireCapableBeanFactory factory;

public InjectionElement(Member member, AutowireCapableBeanFactory factory) {
this.member = member;
this.factory = factory;
}

abstract void inject(Object target);
}

注入元数据类 InjectionMetadata 的主要代码如下:

1
2
3
4
5
6
7
8
9
10
11
12
13
14
15
16
17
18
19
20
21
22
23
24
25
/**
* @author mghio
* @since 2021-03-07
*/
public class InjectionMetadata {
private final Class<?> targetClass;
private List<InjectionElement> injectionElements;

public InjectionMetadata(Class<?> targetClass, List<InjectedElement> injectionElements) {
this.targetClass = targetClass;
this.injectionElements = injectionElements;
}

public void inject(Object target) {
if (injectionElements == null || injectionElements.isEmpty()) {
return;
}
for (InjectionElement element : injectionElements) {
element.inject(target);
}
}

...

}

把一个 Class 转换为 InjectionMetadata 的部分实现我们留到下文实现部分介绍,抽象后总的流程就是把一个 Class 转换为 InjectionMedata ,然后调用 InjectionMedata 提供的 inject(Object) 方法来完成注入(依赖 AutowireCapableBeanFactory 接口提供的 resolveDependency(DependencyDescriptor) 能力),下面是抽象后的字段注入部分的相关类图关系如下:

autowried-arc.png

解析构造出定义的数据结构

在上文我们还没实现将一个类转换为 InjectionMetadata 的操作,也就是需要实现这样的一个方法 InjectionMetadata buildAutowiringMetadata(Class<?> clz),实现过程也比较简单,扫描类中声明的属性找到有 @Autowried 注解解析构造出 InjectinMetadata 实例,核心实现代码如下:

1
2
3
4
5
6
7
8
9
10
11
12
13
14
15
16
17
18
19
20
21
22
23
24
25
26
27
28
29
30
31
32
33
34
35
36
37
38
39
40
41
42
43
44
45
46
47
48
49
50
51
52
53
54
55
56
57
58
59
/**
* @author mghio
* @since 2021-03-07
*/
public class AutowiredAnnotationProcessor {
private final String requiredParameterName = "required";
private boolean requiredParameterValue = true;
private final Set<Class<? extends Annotation>> autowiredAnnotationTypes = new LinkedHashSet<>();

public AutowiredAnnotationProcessor() {
this.autowiredAnnotationTypes.add(Autowired.class);
}

public InjectionMetadata buildAutowiringMetadata(Class<?> clz) {
LinkedList<InjectionElement> elements = new LinkedList<>();
Class<?> targetClass = clz;
do {
LinkedList<InjectionElement> currElements = new LinkedList<>();
for (Field field : targetClass.getDeclaredFields()) {
Annotation ann = findAutowiredAnnotation(field);
if (ann != null) {
if (Modifier.isStatic(field.getModifiers())) {
continue;
}
boolean required = determineRequiredStatus(ann);
elements.add(new AutowiredFieldElement(field, required, beanFactory));
}
}
elements.addAll(0, currElements);
targetClass = targetClass.getSuperclass();
} while (targetClass != null && targetClass != Object.class);
return new InjectionMetadata(clz, elements);
}

protected boolean determineRequiredStatus(Annotation ann) {
try {
Method method = ReflectionUtils.findMethod(ann.annotationType(), this.requiredParameterName);
if (method == null) {
return true;
}
return (this.requiredParameterValue == (Boolean) ReflectionUtils.invokeMethod(method, ann));
} catch (Exception e) {
return true;
}
}

private Annotation findAutowiredAnnotation(AccessibleObject ao) {
for (Class<? extends Annotation> annotationType : this.autowiredAnnotationTypes) {
Annotation ann = AnnotationUtils.getAnnotation(ao, annotationType);
if (ann != null) {
return ann;
}
}
return null;
}

...

}

上面在做数据结构抽象时定义好了注入元素的抽象父类 InjectionElement,这里需要定义一个子类表示字段注入类型,命名为 AutowiredFieldElement,依赖 AutowireCapableBeanFactory 接口的能力解析出字段所属类型的 Bean,然后调用属性的 setter 方法完成注入,在基于我们上面定义好的数据结构后实现比较简单,主要代码如下:

1
2
3
4
5
6
7
8
9
10
11
12
13
14
15
16
17
18
19
20
21
22
23
24
25
26
27
28
29
30
31
/**
* @author mghio
* @since 2021-03-07
*/
public class AutowiredFieldElement extends InjectionElement {
private final boolean required;

public AutowiredFieldElement(Field field, boolean required, AutowireCapableBeanFactory factory) {
super(field, factory);
this.required = required;
}

public Field getField() {
return (Field) this.member;
}

@Override
void inject(Object target) {
Field field = this.getField();
try {
DependencyDescriptor descriptor = new DependencyDescriptor(field, this.required);
Object value = factory.resolveDependency(descriptor);
if (value != null) {
ReflectionUtils.makeAccessible(field);
field.set(target, value);
}
} catch (Throwable e) {
throw new BeanCreationException("Could not autowire field:" + field, e);
}
}
}

注入到 Spring 中

接下来面临的问题是:要在什么时候调用上面这些类和方法呢?在这里我们回顾一下 SpringBean 的生命周期,其中几个钩子入口如下图所示:

bean-lifecycle.png

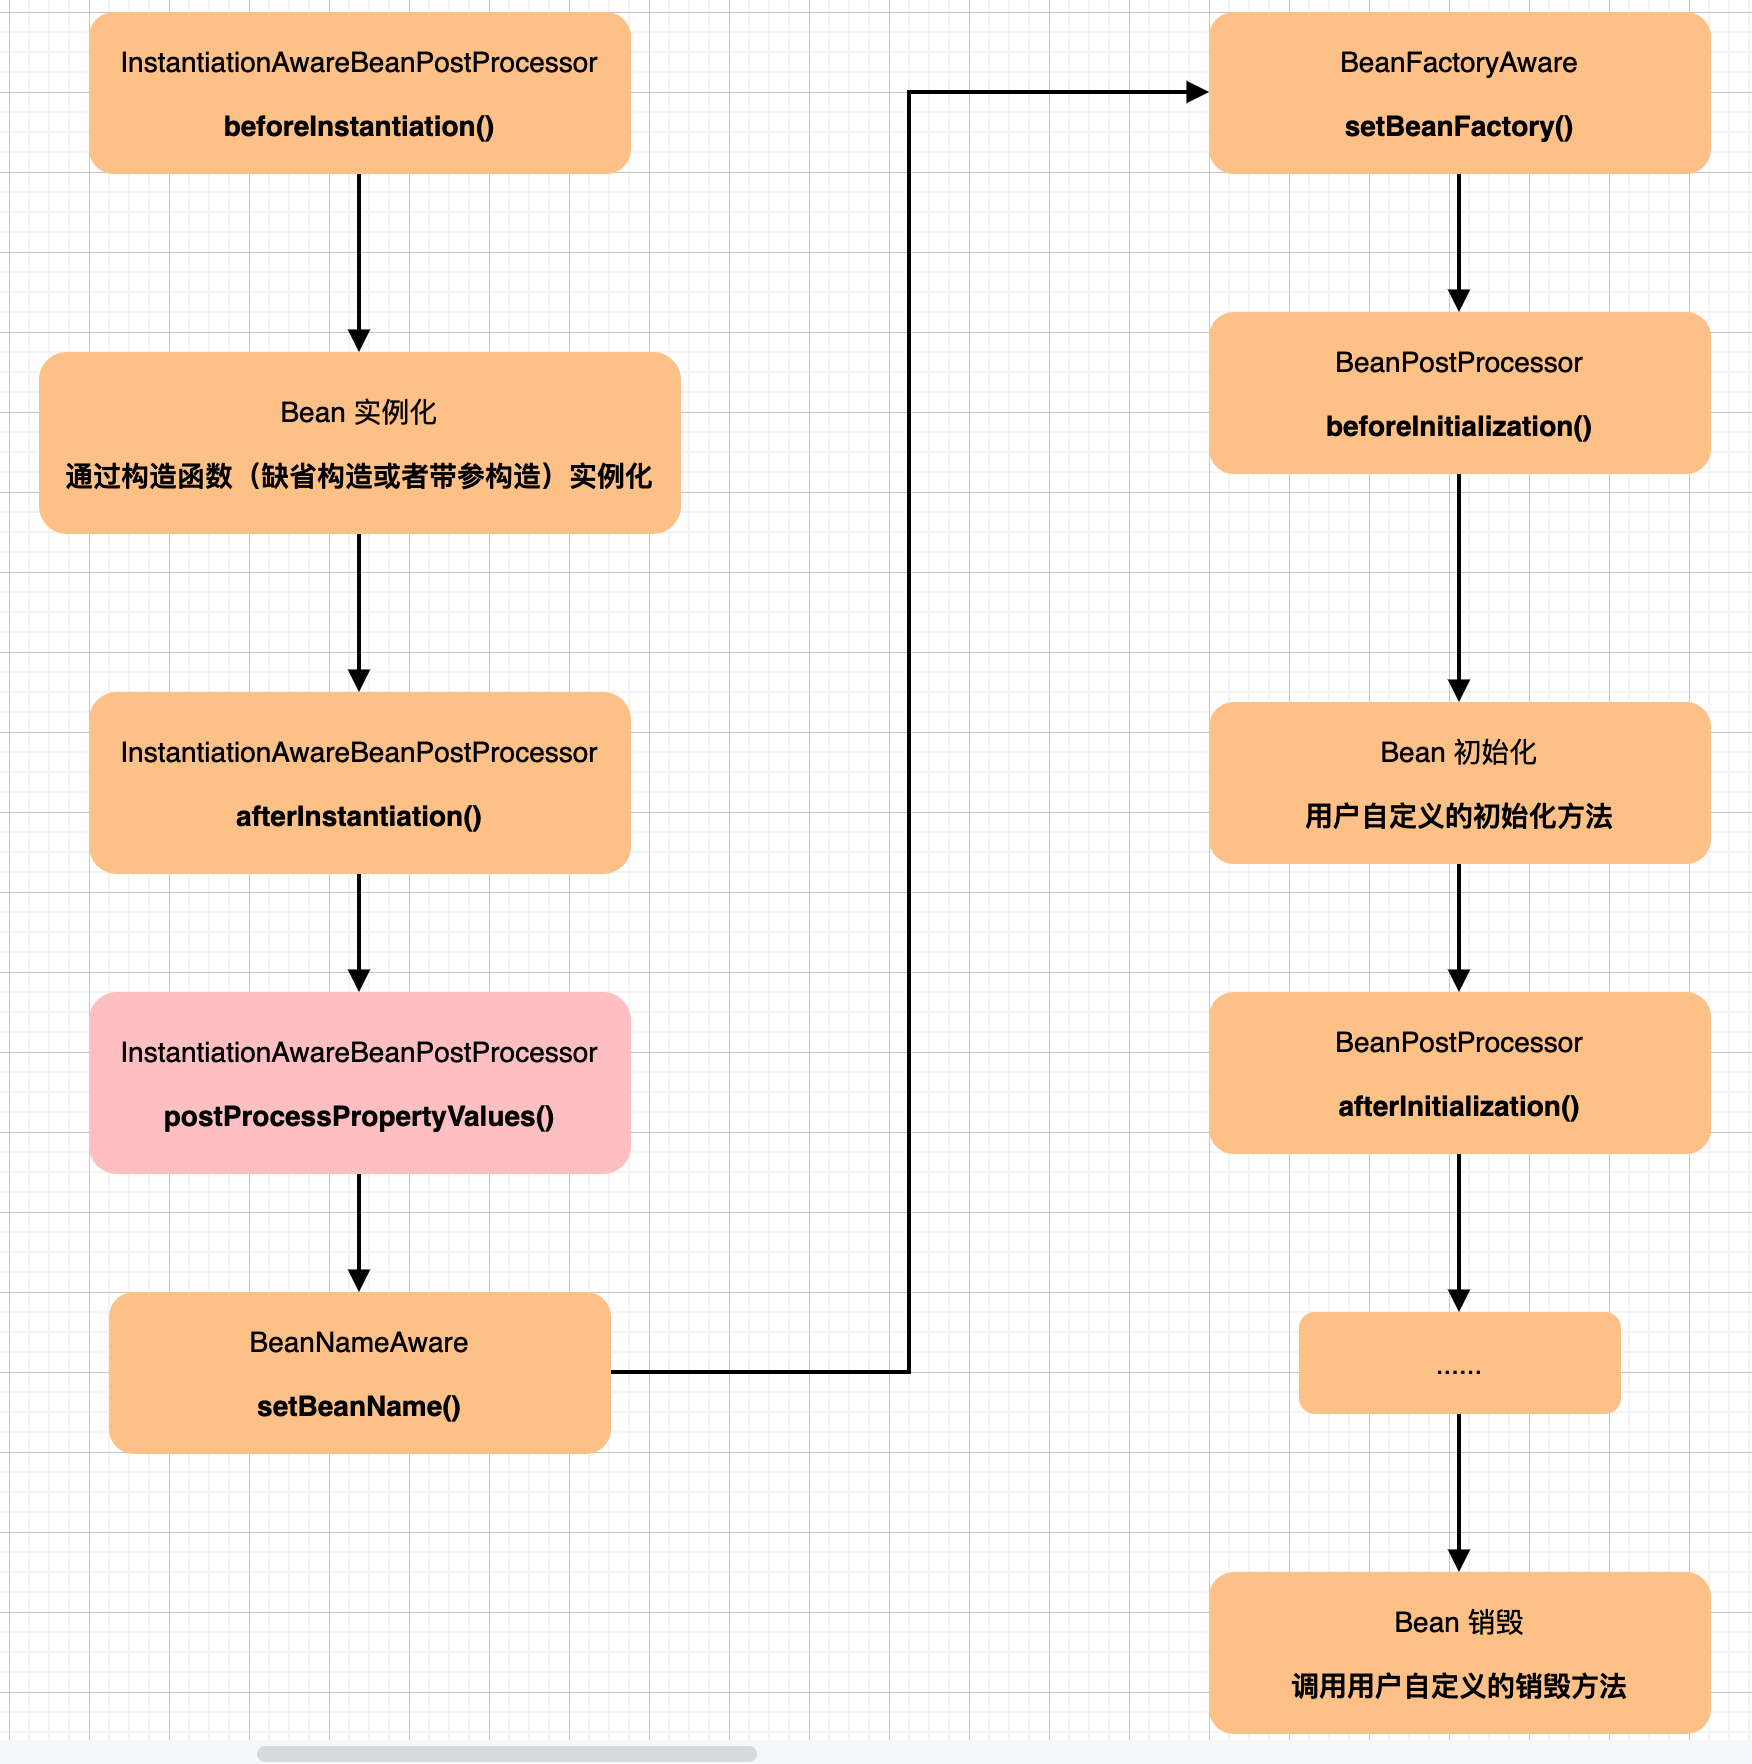
通过生命周期开放的钩子方法可以看出我们需要在 InstantiationAwareBeanPostProcessor 接口的 postProcessPropertyValues 方法中实现 Autowired 注入,将前面的 AutowiredAnnotationProcessor 类实现该接口然后在 postProcessPropertyValues 方法处理注入即可。这部分的整体类图如下所示:

AutowriedAnnotationProcessor.png

AutowiredAnnotationProcessor 处理器实现的 postProcessPropertyValues() 方法如下:

1
2
3
4
5
6
7
8
9
10
11
12
13
14
15
16
17
18
/**
* @author mghio
* @since 2021-03-07
*/
public class AutowiredAnnotationProcessor implements InstantiationAwareBeanProcessor {

...

@Override
public void postProcessPropertyValues(Object bean, String beanName) throws BeansException {
InjectionMetadata metadata = this.buildAutowiringMetadata(bean.getClass());
try {
metadata.inject(bean);
} catch (Throwable e) {
throw new BeanCreationException(beanName, "Injection of autowired dependencies failed");
}
}
}

然后只需要在抽象父类 AbstractApplicationContext 构造函数注册那些我们定义的 processor,然后在 Bean 注入的时候(DefaultBeanFactory.populateBean())调用 processorpostProcessPropertyValues 方法完成属性注入,抽象类 AbstractApplicationContext 改动部分的代码如下:

1
2
3
4
5
6
7
8
9
10
11
12
13
14
15
16
17
18
19
20
21
22
/**
* @author mghio
* @since 2021-03-07
*/
public abstract class AbstractApplicationContext implements ApplicationContext {

...

public AbstractApplicationContext(String configFilePath) {
...
registerBeanPostProcessor(beanFactory);
}

protected void registerBeanPostProcessor(ConfigurableBeanFactory beanFactory) {
AutowiredAnnotationProcessor postProcessor = new AutowiredAnnotationProcessor();
postProcessor.setBeanFactory(beanFactory);
beanFactory.addBeanPostProcessor(postProcessor);
}

...

}

BeanFactory 接口的默认实现类 DefaultBeanFactory 注入 Bean 属性的方法 populateBean(BeanDefinition, Object) 改动如下:

1
2
3
4
5
6
7
8
9
10
11
12
13
14
15
16
17
18
19
20
21
22
23
24
25
/**
* @author mghio
* @since 2021-03-07
*/
public class DefaultBeanFactory extends DefaultSingletonBeanRegistry implements ConfigurableBeanFactory,
BeanDefinitionRegistry {

...

private final List<BeanPostProcessor> beanPostProcessors = new ArrayList<>();

private void populateBean(BeanDefinition bd, Object bean) {
for (BeanPostProcessor postProcessor : this.getBeanPostProcessors()) {
if (postProcessor instanceof InstantiationAwareBeanProcessor) {
((InstantiationAwareBeanProcessor) postProcessor).postProcessPropertyValues(bean, bd.getId());
}
}

...

}

...

}

总的来说整个使用 processor 的过程分为两步,首先在 AbstractApplicationContext 构造方法中注册我们自定义的 processor,然后再 DefaultBeanFactory 中调用其 postProcessPropertyValues 方法进行注入,至此使用在类字段上的 @Autowired 注解实现完成。

总结

本文简要介绍了实现 Spring@Autowired 注解(使用在类字段上的方式),其中比较麻烦的步骤是数据结构抽象部分,需要考虑到后期的扩展性和内部操作对使用者尽量透明,限于篇幅,只列出了部分核心实现代码,完整代码已上传至 GitHub ,感兴趣的朋友可以查看完整代码。

-------------本文结束感谢您的阅读-------------
mghio wechat
微信公众号「mghio」
请我吃🍗